Adobe Premiere Pro
- is the video editing program that you will use to edit your videos. Video editing is the part of making a video called Post Production. Post production occurs after you have shot your video takes and you are putting your project together, building your sound track and adding titles and special effects.
To begin editing, you must:
- transfer your footage from the camera chip to the computer
- copy all your media (video, audio, sound effects) to a folder in the computer that has a lot of storage space (over 50 gigabytes would be nice)
- open Adobe Premiere
- the first time you need to select "New Project"
- name your project
- select the Browse... button
- choose where you are going to save your project, an example might be - E:videowip.
- where ever your storage is, be sure that there is plenty of space (over 30 gig would be nice)
- make a new folder and say ok
- name your sequence (each project can have many sequences like scene 101, scene 201......., or livingroom, at the park..........
- say ok
- the first time you need to select "New Project"
- select the Media Browser tab in the lower left panel
- click on the right pointing triangles to make them open and show your takes
- double click on each take you want to work with, it will put the take in the source window
- allow time for each take to be visable
- view each take in your Source Panel the space bar will start and pause the playing of your chosen take
- mark the in point { (head) and out point } (tail) of each shot
- drag the marked shot to the Timeline: for your current sequence
- go get your next shot
- view your timeline to see if what you have cut together is really what your want
- to get a new sequence for your project, go to "File, New Sequence"
- Save your project often!!!!!!
- if you are continuing to work on a current project select "Open Project"
- View your dailies from last shoot day
FORMS
Tutorial Videos for Premier Pro Videos very good videos you can see on line. Use your headphones!
Set up Adobe Premiere to easily view your dailies and to edit your final sequence.
- Open Adobe Premiere choose new project or open existing project
- choose new project
- name your project
- include your period
- set your location
- use the D: drive
- make a new folder for your project
- accept a sequence - you can and should multiple sequences to manage your shots and to copy and paste between sequences
- note that a new sequence can be made in the File/New/Sequence menu
- Browse to the folder that has your takes
- go to D:\rawtakes to start than find your shots
- In the Media Browser
- click on the first file to select it
- hold the shift key and click on the last file to select all files
- Drag all files to your sequence
- wait for all your takes to appear
- File Save your project
- name your project
- View your takes
- drag a circle take from the sequence to the source window
- in the source window, make the in point { and your out point }
- decide what additional shots you need to complete your sequence
- create your shot list for your next shoot day
- Create another sequence
- File/New/Sequence
- Drag your marked circle take to your new sequence
- Save your project often
- do a save as and rename your project for an extra copy of your project
- Look at your circle takes
- what do you need to complete your sequence?
- prepare for your next shoot
- fill out a call sheet
- complete a shot list
- choose new project
CONTINUITY: THE ABILITY TO SUSPEND THE VIEWER'S DISBELIEF
The idea and fuction of continuity in film/video/multimedia is to create and keep the illusion of the world within the show. As long as the audience accepts and believes what is being presented on the screen and heard through the sound system, then the the show will go on as the film makers intended. Once doubt is introduced and the audience's disbelief is aroused and the illusion ends and the story fails to be told.
example of Continuity Breaks
Key Framing is a powerful tool in animation, video and audio editing. It is used to control volume, complete animated moves from one position to another, begin a fade in or out, and control the speed of a transition.
- If you think of your project as a ribbon of time and you can control what happens to your images and audio at any point along that ribbon, you are beginning to understand key framing.
- Examples
- Open Adobe Premiere
- choose "Open Project"
- in Local Disk (D:)\rawtakes\woodemo find the "mj-maninthemirror.prproj
- open a new project in Adobe Premiere
- Open Adobe Premiere
- Make your own video
- in your Local Disk (D:)\rawtakes\music you will find "Man in the Mirror"
- in your Local Disk (D:)\rawtakes\slides you will find images
- create a video
- you may add more images and sounds of your own
- save your project
The last step in creating a video with computer software is the step called video rendering.
Things you should understand in general about creating videos:
- Store all media for your video in a folder in local storage
- all media would include all images, videos and audio files (music, dialogue, sound effects)
- In our lab, local storage is the D:\ hard drive in the computer you are working on.
- Each computer has it's own D:\ drive, unlike your WinHome storage area which you can reach from any school computer
- Since each computer has it's own D:\ drive, you must work on the same computer from the beginning to the end of your video project
- make many copies of your project files to protect your work
- use the File/Save As/ command and rename each copy with a unique name (example, "show1, show2, show3.....)
About Video Rendering:
- Rendering is the final step. This is when the computer creates a file that one can play and share without the software program which created it, in our case, Adobe Premiere.
- In Premiere, to begin the rendering process, load your finished project file and choose
- File/export/media - this begins the process
- in the Export Settings window, you must choose the type of file you want to create
- H.264 is what we will create for most of our projects
- In the rendering process, you the film maker must choose what type of video file you need, to play your video at it's best. Ask your self what display your video will be seen on and match the right file type with the right display.
- Large displays require large resolution sizes
- small displays, which include cell phones will have low resolutions
- you can choose the right resolution for the right display
- render a large, medium and small resolution version of your video!
- H.264 is what we will create for most of our projects
- once rendered, play each file and check for accuracy.
- In Premiere, to begin the rendering process, load your finished project file and choose
- save this audio/video templete page to you webfolio folder
- create a link to your music video page from your index.html page
- make a 'media' folder in your webfolio
- copy your video to your media folder
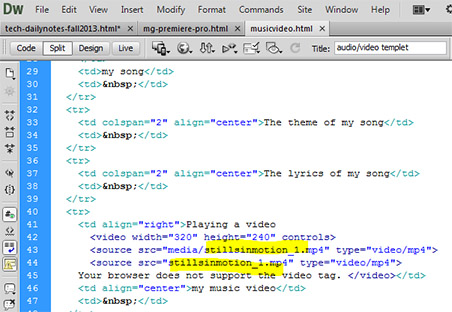
- on your 'audio/video templete' page, use the split screen and in the 'code' window, find this text
<td align="right">Playing a video
<video width="320" height="240" controls>
<source src="media/stillsinmotion_1.mp4" type="video/mp4">
<source src="stillsinmotion_1.mp4" type="video/mp4">
replace the white text with the name of your song
save and put your changed pages
check that it plays online
| starting a new project | the timeline | effects control panel | synicing and unlinkin audio and video | ||||
| customizing your workspace | monitor panels | working with keyframes | clipping video tracks | ||||
| project panal | adding effects | tools panel | titles and exporting video |